INTRODUCTION
Overview
Download and Install
Quick Start
Documentation
Publications
NONFRAMEWORK CODE
Driver Interfaces
Drivers
Libraries
Utilities
FRAMEWORK CODE
Interfaces
Components
Libraries
Utilities
Full Software Listings
DEVELOPER
Tutorials
Examples
Dev Guide
Dashboard
PEOPLE
Contributors
Users
Project
Download
Mailing lists
A bigger system with Player/Stage simulator
- Note:
- Reviewed for release 2.7.0.
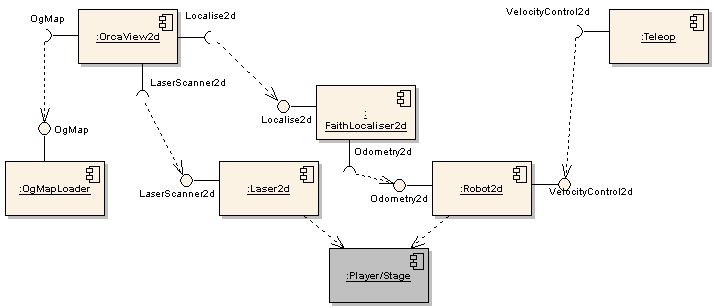
In this tutorial we will assemble a simple robotic system and connect it to the 2D Player/Stage simulator. The system diagram is shown below (IceGrid Registry and IceStorm are will be used but are not shown).

In this tutorial we will use components which have external dependencies.
- Player/Stage to simulate the robotic platform. Debian installation instructions for Player can be found in orca_doc_installdebian. This tutorial was tested with Player/Stage version 2.0.4.
- Qt for the GUI. Debian installation instructions are found here orca_doc_installdebian_qt
Starting Orca
Start IceGrid Registry and IceStorm server as described in the Quick-Start Guide.
Create a new system directory and copy Orca sample files.
$ mkdir -p ~/sys/tutestage; cd ~/sys/tutestage
$ cp [ORCA_INSTALL]/cfg/laser2d.cfg ./
$ cp [ORCA_INSTALL]/cfg/robot2d.cfg ./
$ cp [ORCA_INSTALL]/cfg/faithlocaliser.cfg ./
$ cp [ORCA_INSTALL]/cfg/teleop.cfg ./
$ cp [ORCA_INSTALL]/cfg/ogmaploader.cfg ./
$ cp [ORCA_INSTALL]/cfg/orcaview2d.cfg ./
In this tutorial we'll run 6 components. Each one will need a separate terminal. (Advanced: another option is to put all components into an application server called IceBox which runs them in a single process. See tutorial Running components inside the IceBox server.)
Starting Player/Stage
Copy Stage sample files.
$ cp -r [STAGE-SRC]/worlds .
To simplify our localization, we'll make Stage report a global position in this simple world. To do this you need to add "localization" property to the worlds/pioneer.inc file
define pioneer2dx position
(
  ...
  localization "gps"
  localization_origin [0 0 0]
)
Start up the Stage simulator with the simple world.
$ player worlds/simple.cfg
Platform components
- Laser scanner
The Laser2d component will use the Player driver and it needs to know that we are using the simulator. You have to modify the following lines of laser2d.cfg:
...
Laser2d.Config.NumberOfSamples=361
Laser2d.Config.DriverLib=libHydroLaserScanner2dPlayerClient.so
Laser2d.Config.PlayerClient.Driver=stage
...
Now run the Laser2d component.
$ laser2d
Check the Stage world window: you should see the laser scan after the Laser2d component made the connection. Note that occasionally, Stage does not show the scan. A quick check to see whether it's working is to run LaserMon component (as described in Quick-Start Guide).
- Robot hardware
We're now going to set up the low level control to the actuators for the simulated robot using the Robot2d component. The robot2d.cfg file is already configured the way we want it here, so simply run the component:
$ robot2d
- Localisation
To display the robot in the GUI we need a localisation component. Here we'll use the simplest one possible FaithLocaliser which assumes that the odometry is flawless. Nothing needs to be done to the configuration file, so just start the componenet.
$ faithlocaliser
- Map of the world
To display the world in the GUI we'll use the OgMapLoader component which loads an image file, converts it to a (static) occupancy grid map and serves it on demand to clients. In this case, we are using the same file which Stage is using to simulate the world. We edit the ogmaploader.cfg file as shown.
...
OgMapLoader.Config.MapFileName=./worlds/bitmaps/cave.png
OgMapLoader.Config.Negate=0
OgMapLoader.Config.Offset.Orientation=0.0
OgMapLoader.Config.Offset.X=-8.0
OgMapLoader.Config.Offset.Y=-8.0
OgMapLoader.Config.Size.X=16.0
OgMapLoader.Config.Size.Y=16.0
...
Start the component
$ ogmaploader
View the world in the GUI
To view the world and the robot we use orca_component_orcaview2d component. One line of the standard config file needs to be modified:
...
OrcaView2d.Config.Element.Detail01=localise2d@local/faithlocaliser
...
Start the GUI component
$ orcaview2d
You should now see the the simple world from stage. If it is partially off the screen, drag it with the left mouse button so that you can view the full world. Resize the view with the right mouse button. You should be able to see the robot and the laser scans.
Keyboard/Joystick Control
To tell the robot to move we can use Teleop component, the same way it was done in the Driving a robot simulated with Player/Stage tutorial.
$ teleop
As the robot moves through the world, compare the display of the OrcaView2d and the Stage world window: they should be identical.
What's Next
If everything works, check out more Orca Tutorials.

 1.4.5
1.4.5