INTRODUCTION
Overview
Download and Install
Quick Start
Documentation
Publications
NONFRAMEWORK CODE
Driver Interfaces
Drivers
Libraries
Utilities
FRAMEWORK CODE
Interfaces
Components
Libraries
Utilities
Full Software Listings
DEVELOPER
Tutorials
Examples
Dev Guide
Dashboard
PEOPLE
Contributors
Users
Project
Download
Mailing lists
Orca2Yarp
[Examples, Stand-Alone Components, C++, Linux]
An example of using Orca and Yarp in the same component. More...
An example of using Orca and Yarp in the same component.
- Provides
- orca_interface_home
- orca_interface_status
- orca_interface_tracer
- Requires
- orca_interface_odometry2d

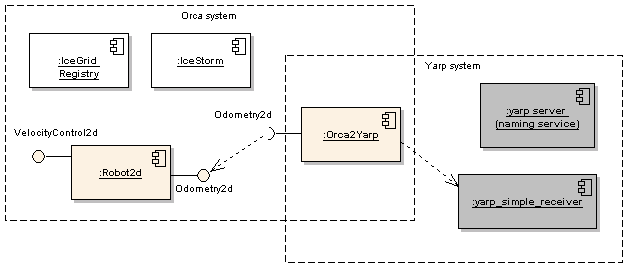
An Orca component which gets remote odometry information from another Orca component and publishes them through a Yarp port. This example also builds two Yarp-only executables: a server and a client, the code is taken from the Yarp project.
This is a bare-bones example! No error checking is performed (on both Orca and Yarp sides). For examples of proper error checking and exception handling, see components in the repository.
Compilation of this example is disabled by default because we don't check properly if Yarp is installed. To enable it, first install Yarp (see below), then use ccmake utility, scroll down to Orca2Yarp and hit enter to change OFF to ON. Recompile Orca and re-install.
- Prerequisites
Requires Yarp installed. Tested with Yarp v. 2.1.4. We assume that Yarp is installed in /opt/yarp. We recommend to install Yarp into /opt/yarp-[VERSION] by editing the CMAKE_INSTALL_PREFIX variable with ccmake before installing. Then create a symbolic link.
# ln -s /opt/yarp-[VERSION] /opt/yarp
Otherwise, you can modify the CMakeLists.txt file for this example to match your installation.
- Authors
Alex Makarenko
Tutorial
We will assemble a system shown below.

Start by making sure that the basic Yarp example works. In three separate terminal windows start the naming service, the sender, and the receiver.
$ /opt/yarp/bin/yarp server
$ yarp_simple_sender
$ yarp_simple_receiver
If everything works, kill the yarp_simple_sender, leave the other two apps running. If something doesn't work, consult with Yarp documentation.
Start the IceGrid Registry as described in Quick-Start Guide. We will also need the IceStorm service, but we have to change its port number (we typically use port 10000 for IceStorm and Yarp uses it for their naming service). Start the IceStorm as described in Quick-Start Guide but with the following modified line in the icebox_icestorm.cfg file:
IceStorm.TopicManager.Endpoints=default -p 20000
Now we create the tute directory and copy two pre-installed config files.
$ mkdir -p ~/sys/yarp; cd ~/sys/yarp
$ cp [ORCA-INSTALL]/cfg/robot2d.cfg .
$ cp [ORCA-INSTALL]/cfg/orca2yarp.cfg .
Edit the robot2d.cfg file by changing the driver name to fake and appending a line about the non-standard IceStorm port.
Robot2d.Config.Driver=fake
...
IceStorm.TopicManager.Proxy=IceStorm/TopicManager:default -t 8000 -p 20000
Start the Robot2d component.
$ robot2d robot2d.cfg
Append the line about IceStorm port to the orca2yarp.cfg file. In a new terminal, start the Orca2Yarp example.
$ orca2yarp orca2yarp.cfg
Look at the output of the yarp_simple_receiver. You should start seeing messages from Orca2Yarp containing (fake) odometry information.

 1.4.5
1.4.5